How to Repair RV Awning Fabric: DIY Guide for Common Tears

Alana Azzouz is a Senior Editor at Searchshop Media Network with over a decade of experience in consumer content quality and editorial standards. She has reviewed thousands of product guides, buying articles, and comp…
✎ Reviewed by Alana Azzouz — Senior Editor
Why trust us
RVGearInsider articles are researched by the Searchshop Editorial team using manufacturer specs, independent expert sources, and owner feedback. Our goal is simple: when an RVer searches for gear, the recommendations they read online should match what a knowledgeable dealer or experienced owner would actually suggest. We may earn a commission on qualifying affiliate purchases; it doesn't influence what we recommend — if a product changes or a better option comes along, the article changes too.
If you are searching for how to repair RV awning fabric, the good news is that many common rips, pinholes, and seam failures can be fixed at home with basic tools. We have tested tape patches, adhesive kits, and fabric repair methods on typical vinyl and acrylic RV awnings, and in many cases a careful DIY repair can buy you another season or two before full replacement becomes necessary.
Best RV Awning Repair Options Compared

If you are deciding what to buy, this side-by-side table covers the repair types we recommend most often.
| Repair Option | Best For | Works On | Durability | Difficulty | Typical Cost |
|---|---|---|---|---|---|
| Awning repair tape | Small tears, pinholes, edge cuts | Vinyl, some acrylic | Medium | Easy | Low |
| Vinyl patch kit with adhesive | Larger tears, punctures | Vinyl | Medium-High | Moderate | Low-Mid |
| Fabric patch kit | Woven acrylic awnings | Acrylic | Medium | Moderate | Mid |
| Seam sealer | Leaky or splitting seams | Vinyl, acrylic | Medium | Easy | Low |
| Sewn patch plus adhesive backing | Stress-point tears | Vinyl, acrylic | High if done well | Advanced | Mid |
Our Verdict
For most RV owners, awning repair tape is the fastest and easiest fix for small damage, while a patch kit is the better long-term choice for tears larger than a few inches. If the tear sits near a seam or high-tension area, we recommend reinforcing the repair with both patch material and seam sealer.
When RV Awning Fabric Can Be Repaired
Not every tear means the awning is done. In our experience, repairs work best when the damage is:
- Smaller than 6 to 12 inches
- Away from the roller tube end caps and major stress points
- Limited to a clean tear, puncture, or seam split
- On fabric that is otherwise flexible and not badly sun-rotted
A repair is usually not worth it if:
- The fabric is brittle, chalky, or cracking in multiple places
- Mold, dry rot, or UV damage affects large sections
- The awning arms are bent and causing repeated fabric strain
- The tear runs deep into the bead or polycord that slides into the track
Identify Your Awning Fabric First

Before we start, confirm what material you have. Repair products do not all bond equally well to every awning fabric.
Vinyl Awning Fabric
Vinyl is common on many RV patio awnings. It has a smooth, coated surface and is usually the easiest to patch with awning repair tape or vinyl adhesive.
Acrylic Awning Fabric
Acrylic fabric feels more woven and breathable. It can still be patched, but you may need a fabric-specific repair kit instead of standard vinyl tape.
Laminated or Weathered Fabric
Older awnings may have coatings that are peeling or surfaces that no longer hold adhesive well. In those cases, a sewn patch or full replacement may be the better call.
Tools and Materials We Recommend
Here is the basic DIY repair kit we keep on hand.
Essential Tools
- Step ladder
- Tape measure
- Scissors or utility knife
- Soft brush or cloth
- Rubbing alcohol or awning-safe cleaner
- Roller or plastic squeegee
- Marker or painter's tape
- Disposable gloves
Repair Materials
- RV awning repair tape
- Vinyl patch kit or fabric patch kit
- Flexible seam sealer
- Matching awning patch material
- Optional: heavy-duty outdoor thread and curved needle
Buyers Guide: Our Top Repair Picks
We do not lock ourselves into one brand for every job. Instead, we match the repair type to the damage.
1. Awning Repair Tape
Who It's For: RV owners who need a quick, low-cost fix for small tears, punctures, or worn spots.
Pros:
- Fastest repair method
- Minimal tools required
- Great for emergency campground fixes
- Works well on clean vinyl surfaces
Cons:
- May peel on heavily weathered fabric
- Not ideal for large structural tears
- Appearance is more functional than seamless
2. Vinyl Patch Kit
Who It's For: Owners with standard vinyl awnings and damage too large for tape alone.
Pros:
- Stronger hold than tape on larger tears
- Better for matching shape and coverage
- More durable under tension when applied correctly
Cons:
- Takes more prep time
- Adhesive cure time can delay awning use
- Surface must be very clean for best results
3. Acrylic Fabric Repair Kit
Who It's For: RVers with woven acrylic awnings that do not bond well with basic vinyl products.
Pros:
- Better compatibility with acrylic fabric
- More flexible finish
- Good option for breathable awning materials
Cons:
- Usually costs more than generic tape
- Fewer color matches available
- May require extra drying or curing time
4. Seam Sealer
Who It's For: Anyone dealing with minor seam leaks, loose stitching, or preventive maintenance.
Pros:
- Easy to apply
- Helps stop water intrusion early
- Useful as a reinforcement step after patching
Cons:
- Not a standalone fix for major tears
- Can look messy if overapplied
- Needs periodic reapplication in harsh sun
Safety Tips Before You Start
Awning repairs are simple, but we still recommend a few precautions.
- Work on a dry, calm day with little wind
- Extend the awning only as far as needed for safe access
- Use a stable ladder on level ground
- Wear gloves when using adhesive or cleaners
- Keep sparks, flames, and smoking materials away from solvents
- Never climb or lean heavily on the awning roller tube
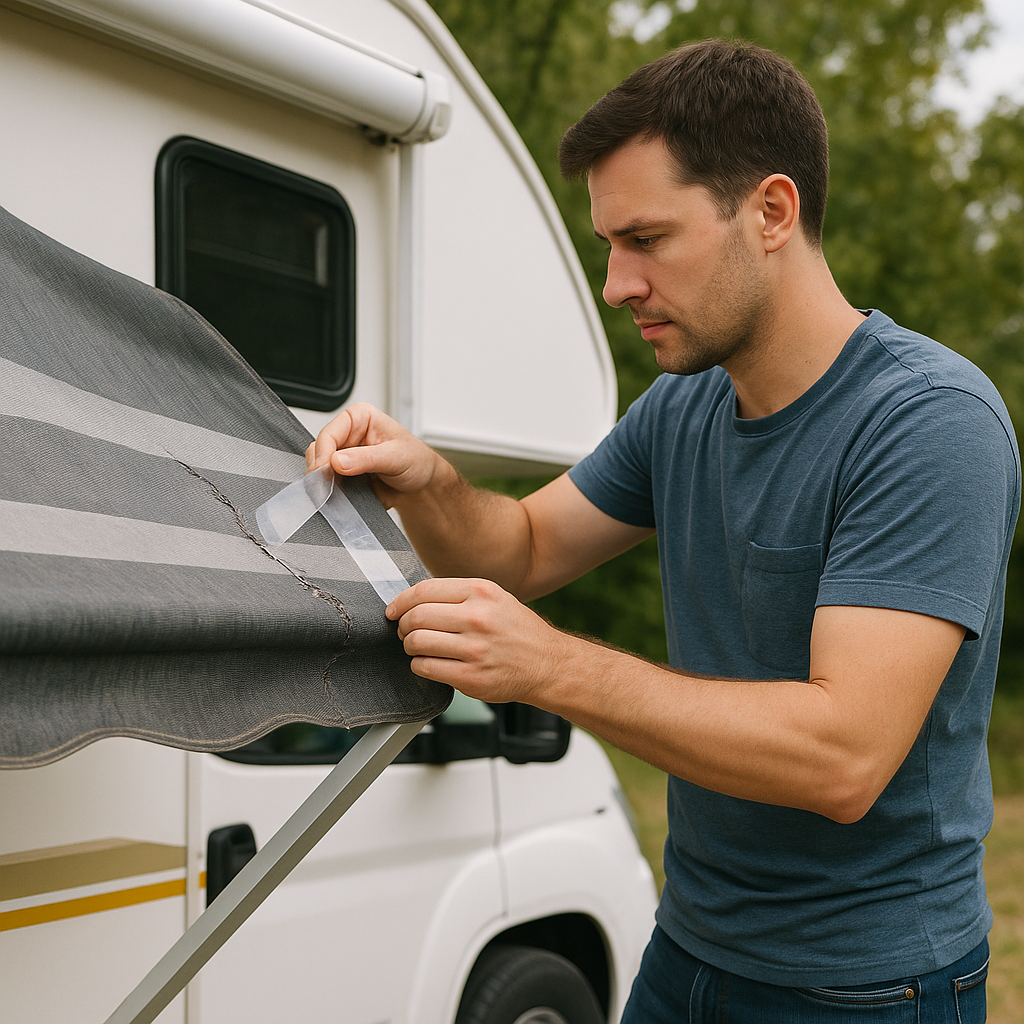
How to Repair RV Awning Fabric Step by Step
The exact method depends on the damage, but this process works for most common tears.
1. Inspect the Tear Carefully
Measure the length and check whether the fabric around it is still strong. If the surrounding material feels brittle or cracked, skip the repair and plan for replacement.
2. Clean the Area Thoroughly
Brush off dirt, then wipe the repair zone with rubbing alcohol or a cleaner approved for awning fabric. Adhesive will not hold well on chalky, dusty, or oily surfaces.
Let the area dry completely.
3. Trim Loose Threads or Ragged Edges
Use scissors or a utility knife to remove frayed bits. We want a smooth, flat repair surface so the patch can bond evenly.
4. Align the Tear
If the fabric has split, gently bring the edges together without bunching. Painter's tape can help hold the shape from the opposite side while you work.
5. Cut Your Patch or Tape Oversized
Cut the repair material so it extends at least 1 inch beyond the tear on all sides. For larger damage, we prefer 2 inches of overlap.
Round the patch corners instead of leaving sharp square edges. Rounded corners are less likely to lift over time.
6. Apply the Repair Material
For tape:
- Peel the backing slowly.
- Center the tape over the tear.
- Press from the middle outward.
- Use a roller or squeegee to remove bubbles.
For adhesive patch kits:
- Apply adhesive as directed.
- Position the patch carefully.
- Press firmly across the full surface.
- Add a matching patch to the opposite side if the kit and damage size justify it.
7. Seal the Edges if Needed
For high-stress repairs or seam-area fixes, add a thin bead of flexible seam sealer around the patch edge. We have found this helps reduce edge lifting in hot, wet weather.
8. Allow Full Cure Time
This is where many DIY repairs fail. Follow the product instructions exactly. Some tapes hold immediately, but many adhesives need several hours or even a full day before the awning should be rolled up.
9. Test the Repair Gently
Open and close the awning once, slowly. Watch for patch lifting, wrinkling, or fresh strain around the damaged area.
How to Fix Specific Types of Awning Damage
Small Pinhole or Puncture
Use a small piece of repair tape on both sides if accessible. This is usually the easiest fix and often lasts surprisingly well.
Straight Tear in the Middle of the Fabric
Use a patch that overlaps generously. For tears over a few inches, we recommend reinforcing both sides when possible.
Tear Near a Seam
Use a patch plus seam sealer. This area flexes more, so tape alone may not last as long.
Edge Tear Near the Awning Rail or Roller
This is more difficult because the area carries more load. A sewn patch with adhesive backing may hold temporarily, but if the bead or edge structure is damaged, replacement is usually the smarter move.
Common Mistakes to Avoid
We see the same repair problems over and over.
- Applying tape to dirty fabric
- Patching wet material
- Using indoor fabric glue instead of outdoor-rated products
- Cutting a patch too small
- Rolling up the awning before adhesive cures
- Ignoring bent hardware that caused the tear in the first place
Repair vs. Replace: When to Stop Patching
A DIY fix makes sense when the awning is mostly healthy and the damage is isolated. But if you are stacking patch over patch, dealing with repeated tearing, or seeing widespread UV breakdown, replacement is usually more cost-effective.
As a rule, we recommend replacement if:
- There are multiple tears across the canopy
- The fabric sags badly or delaminates
- Repairs would cover a large visible section
- The awning is over a decade old and heavily weathered
Final Thoughts
Learning how to repair RV awning fabric can save money, prevent a small tear from spreading, and keep your setup usable through the season. For quick fixes, we recommend repair tape. For larger damage, a proper patch kit gives better long-term results. The key is careful cleaning, generous overlap, and enough cure time before rolling the awning back up.
FAQ
What is the best way to repair a torn RV awning?
For a small tear, awning repair tape is usually the easiest option. For larger tears, we recommend a vinyl or fabric patch kit with enough overlap to spread the load.
Can Gorilla Tape repair RV awning fabric?
It may work as a very short-term emergency fix, but we do not recommend it as a proper awning repair. RV-specific awning tape or patch kits hold up better to sun, heat, and moisture.
Should I patch both sides of the awning fabric?
If you can access both sides and the tear is more than a minor puncture, yes. A two-sided repair generally lasts longer and handles tension better.
How long does an RV awning fabric repair last?
A good repair can last months or even years, depending on the fabric condition, repair product, weather exposure, and how often the awning is used.
Can I repair an awning without removing it from the RV?
Yes. Most small and moderate repairs can be done with the awning extended on the RV, as long as you can safely reach the damaged area.
Get your free Get Our Free Full-Timer's Gear Guide
The no-fluff gear list trusted by full-time RVers — tested in real conditions across North America.