RV Water Pump Won't Prime or Build Pressure: Step-by-Step Fix Guide

Salem Hassan founded Travelcamp RV and brings 30+ years of hands-on RV, marine, and powersports experience to every review.
✎ Reviewed by Salem Hassan — Founder, Travelcamp · 30+ years in RV, marine, and powersports
Why trust us
RVGearInsider articles are researched by the Searchshop Editorial team with a full-timer's lens — evaluating gear for year-round use, not weekend trips. We assess every recommendation against the demands of full-time living: sustained power draw, weight budget, water system integration, and long-term durability. We may earn a commission on qualifying purchases; it does not change what we recommend.


If your RV water pump runs continuously, sputters, or never seems to build steady pressure, the problem is usually fixable with a methodical approach. In this rv water pump won't prime troubleshooting guide, we researched the most common failure points in RV fresh water systems and organized them into a practical, step-by-step process.
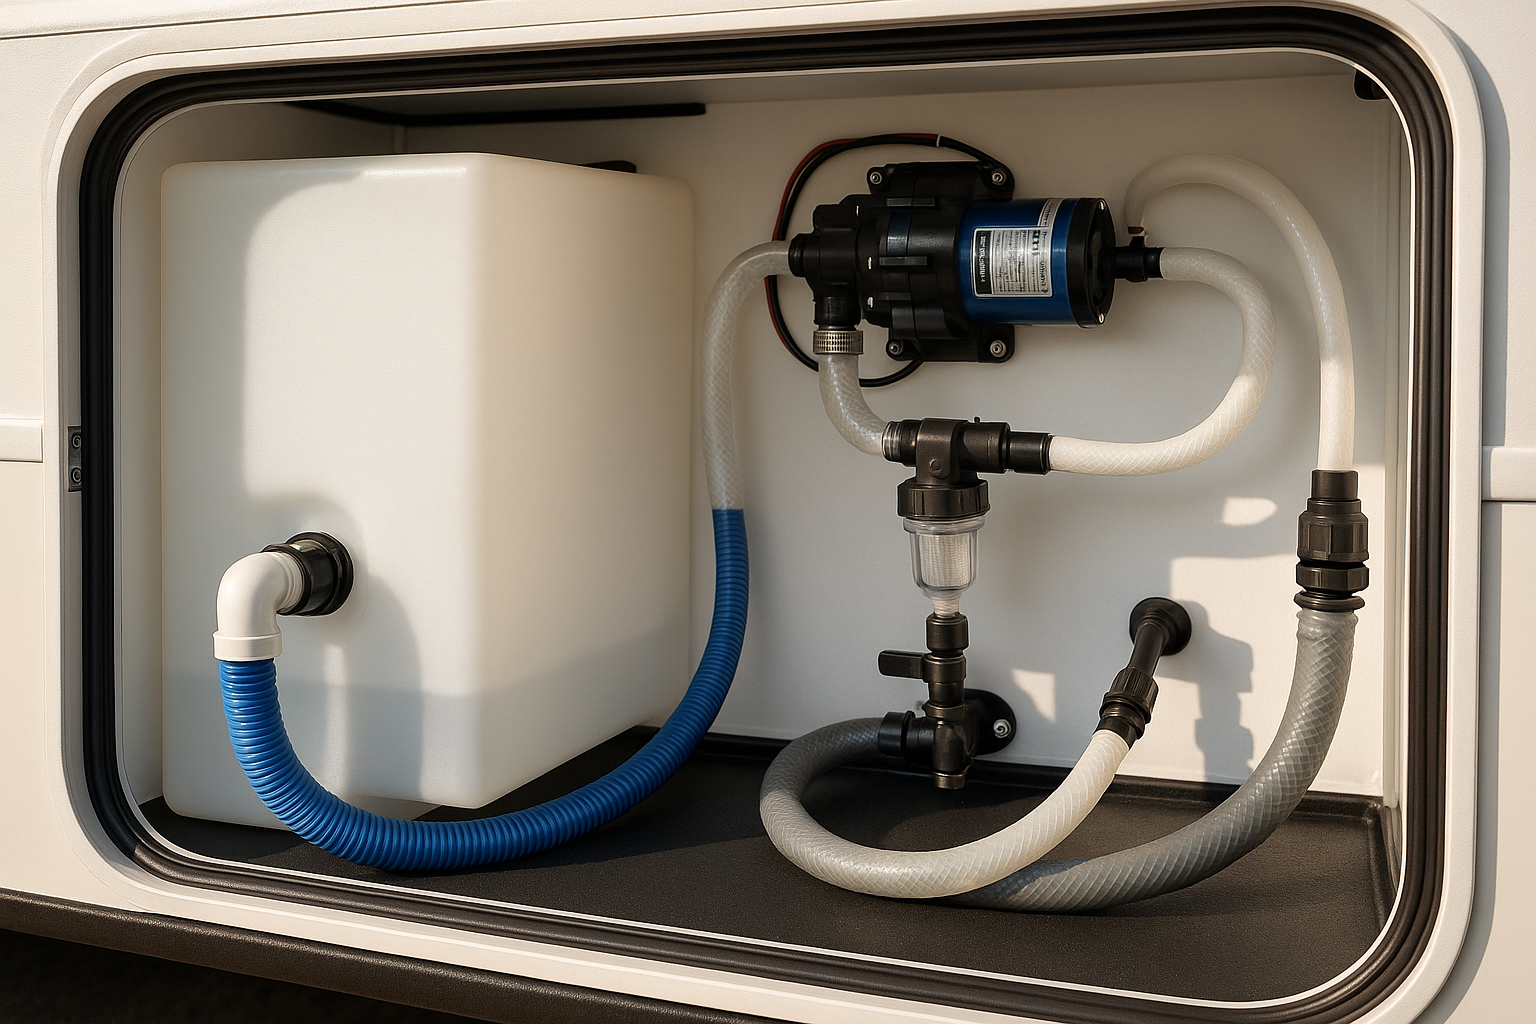
Most RV demand pumps are simple on paper: they pull water from the fresh tank, prime the inlet side, pressurize the plumbing, and shut off once system pressure reaches the switch setting. When any part of that chain fails, the pump may run dry, cycle endlessly, or deliver weak, inconsistent flow.
The good news is that you can often solve the issue with basic hand tools, a flashlight, and a few inexpensive replacement parts.
What's Going Wrong

An RV water pump that won’t prime or build pressure usually shows up in one of a few ways:
- The pump turns on, but no water comes out of the faucets
- The pump runs continuously and never shuts off
- Water sputters with bursts of air, then stops
- Pressure is weak at every fixture, not just one faucet
- The problem appears after winterization, de-winterization, tank refill, filter replacement, or long storage
We most often see this happen after the system has been opened up and allowed to draw air. It can also happen when the fresh tank runs low, a strainer clogs, a hose fitting loosens, or an internal pump part like the check valve or diaphragm starts to fail.
Before replacing the pump, it helps to confirm whether the issue is system-wide. If both hot and cold sides are affected at multiple fixtures, the problem is usually near the pump, tank pickup, or main water line rather than at an individual faucet.
Root Causes
Empty Fresh Tank or Tank Pickup Issue
If the fresh tank is empty, lower than expected, or the pickup tube inside the tank is not drawing properly, the pump may run but never pull enough water to prime.
Air Leak on the Suction Side
A tiny air leak between the fresh tank and the pump inlet can stop priming completely. Because this side of the system draws water under suction, even a loose fitting that never drips water can still pull in air.
Clogged Pump Strainer or Inlet Restriction
Most RV pumps have a small inline strainer at the inlet. Sediment, plastic shavings, mineral debris, or winterization residue can block flow enough to prevent priming or pressure buildup.
Bypass, Winterization, or Valve Misposition
If a winterization valve, sanitizing bypass, or water heater bypass is left in the wrong position, the pump may pull air instead of water or fail to pressurize the plumbing correctly.
Faulty Check Valve, Diaphragm, or Pressure Switch
When the pump’s internal check valve sticks open, the diaphragm is worn, or the pressure switch malfunctions, the pump may run without building normal pressure. This is more common in older pumps or units that have been run dry repeatedly.
Step-by-Step Fix

Empty Fresh Tank or Tank Pickup Issue
Tools/parts needed: flashlight, clean water source, screwdriver, owner’s manual, replacement pickup hose or clamp if needed
- Confirm the tank actually has water. Tank sensors are often inaccurate. We recommend physically verifying the water level if possible rather than relying only on the monitor panel.
- Fill the fresh tank to at least one-third full. Some pickups lose prime more easily when the tank is very low or the RV is parked off-level.
- Park as level as possible. If the pickup sits at one end of the tank, a nose-high or side-leaning position can expose it to air.
- Listen to the pump while opening a cold faucet. A change from a high-pitched whine to a deeper pumping sound may indicate it is starting to draw water.
- Inspect the tank outlet and pickup connection if accessible. Look for a cracked hose, loose clamp, kinked line, or disconnected pickup tube.
- Tighten or replace damaged tubing and clamps. If the pickup hose inside or near the tank has split, the pump may pull air before it pulls water.
- Prime again by opening the nearest cold faucet. Let the pump run briefly while the faucet remains open to purge trapped air.
Air Leak on the Suction Side
Tools/parts needed: flashlight, adjustable pliers, screwdriver, replacement hose clamps, Teflon tape if threaded fittings are used, food-grade flexible tubing if replacement is needed
- Trace the line from the fresh tank to the pump inlet. Focus on every fitting, elbow, clamp, and threaded connection.
- Check for loose fittings first. We recommend hand-tightening plastic fittings carefully and using tools only enough to snug them without cracking the housing.
- Inspect for hairline cracks. Clear strainers, plastic elbows, and older flexible tubing are common leak points.
- Look for signs of flattening or kinks. A collapsed suction hose can mimic an air leak by starving the pump.
- Reseat threaded fittings if needed. Remove the fitting, inspect the threads, reapply thread sealant appropriate for potable water systems, and reinstall.
- Replace brittle tubing or weak clamps. Even if water never drips out, suction-side leaks can still prevent priming.
- Test the pump again with one faucet open. If the pump now catches prime and clears the air, the leak was likely on the inlet side.
Clogged Pump Strainer or Inlet Restriction
Tools/parts needed: towel, small bowl, soft brush, clean water, replacement strainer O-ring if damaged
- Turn off 12V power to the pump. This prevents the pump from cycling while you open the strainer.
- Place a towel and bowl under the pump area. Some water will spill when the strainer is removed.
- Unscrew the inlet strainer bowl. Most are clear and hand-removable.
- Clean the screen thoroughly. Remove sediment, mineral flakes, and any plastic debris.
- Inspect the O-ring. A pinched or cracked O-ring can create an air leak after reassembly.
- Rinse and reinstall the strainer carefully. Make sure the bowl seats evenly and is snug, not overtightened.
- Check upstream restrictions. If your RV has an additional filter on the pump inlet, inspect or replace it.
- Restore power and reprime the system. Open a faucet and let the pump push air out until flow becomes steady.
Bypass, Winterization, or Valve Misposition
Tools/parts needed: owner’s manual or plumbing diagram, flashlight, labeling tape if needed
- Locate the winterization and bypass valves. These are often near the pump, water heater, or utility panel.
- Confirm the pump is drawing from the fresh tank, not the winterization siphon hose. If the siphon valve is open, the pump may pull air from an empty hose.
- Check the water heater bypass position. While this usually affects hot-side behavior more than priming, incorrect valve settings can confuse diagnosis.
- Inspect any selector valves for city water versus tank fill modes. Some manifolds can partially misroute flow if not fully engaged.
- Reset valves to the normal operating configuration. We recommend following your RV’s plumbing diagram if available.
- Label the correct positions. A small tape label can prevent repeat issues after storage or winterizing.
- Run both cold and hot faucets one at a time. This helps purge trapped air from all branches of the system.
Faulty Check Valve, Diaphragm, or Pressure Switch
Tools/parts needed: multimeter, screwdriver, pump rebuild kit if available, replacement pump if needed, manufacturer manual
- Confirm the pump is receiving proper voltage. A weak 12V supply can cause poor pump performance, so check battery condition and voltage at the pump terminals.
- Listen for abnormal operation. Rapid cycling, a rough buzzing sound, or no change in tone while running can point to internal pump wear.
- Inspect for external leaks around the pump head. A failed diaphragm or cracked housing may leak while running.
- Check whether water backflows into the tank or pressure bleeds off quickly. That can indicate a bad internal check valve.
- Adjust the pressure switch only if the manufacturer allows it. Small adjustments may help in some models, but random adjustment can create new problems.
- Install a rebuild kit if your pump model supports it. Replacing valves and diaphragms can restore performance on some premium pumps.
- Replace the pump if internal wear is advanced. If the motor runs but the pump will not reliably prime or hold pressure after the above checks, replacement is often the most efficient solution.
When to Call a Pro
Most priming and pressure issues are DIY-friendly, but there are clear times to stop and bring in a technician.
Call a pro if:
- You smell burning insulation, see melted wiring, or suspect an electrical short
- The pump repeatedly blows a fuse or trips protection circuits
- Plumbing access requires removing major panels or underbelly sections you are not comfortable opening
- The pump housing, manifold, or tank fitting is cracked in a way that risks water damage
- You need specialty diagnostics for low voltage, hidden leaks, or control board issues
- Your RV or pump is still under warranty and disassembly could affect coverage
We also recommend professional help if you have completed the basic rv water pump won't prime troubleshooting steps and the pump still runs without building pressure. At that point, the issue may involve an internal pump failure, hidden suction leak, or plumbing routing problem that takes more time to isolate.
Frequently Asked Questions
Why does my RV water pump run but no water comes out?
Usually the pump is not primed, the fresh tank is empty, the suction side is drawing air, or the inlet strainer is clogged. Start by verifying water in the tank, then inspect the line and strainer between the tank and pump.
Can an RV water pump lose prime after winterization?
Yes. This is one of the most common scenarios we researched. A winterization valve left open, an empty siphon hose, or trapped air in the lines can keep the pump from drawing water normally.
How long should I let an RV pump run to prime?
Only briefly while actively diagnosing, especially if you suspect it is running dry. If it does not begin drawing water within a short period after confirming tank level and valve position, stop and inspect for air leaks or restrictions rather than letting it run continuously.
Will a clogged faucet aerator keep the pump from building pressure?
Usually no, not if the issue affects the whole RV. A clogged aerator may reduce flow at one fixture, but a pump that won’t prime or build system-wide pressure usually has a problem closer to the tank, inlet, valves, or pump itself.
Should I replace the pump or rebuild it?
That depends on the pump model, age, and part availability. If a rebuild kit is readily available and the motor is in good shape, rebuilding can make sense. If the pump is older, noisy, intermittently failing, or close in cost to a new unit, replacement is often the better long-term value.
A calm, systematic approach usually solves this problem faster than jumping straight to parts replacement. Start with water supply, then suction leaks, then strainers and valves, and only after that move to internal pump faults. That order saves time, avoids unnecessary expense, and gives you the best chance of restoring reliable RV water pressure quickly.
Get your free Get Our Free Full-Timer's Gear Guide
The no-fluff gear list trusted by full-time RVers — tested in real conditions across North America.
Recommended Tools & Parts